Quick Release Side Handle for Camera Cages: Setup & Fit

Quick Release Camera Cage Side Handle for Faster Rig Changes and Better Control
A side handle can make handheld shots steadier, reduce wrist strain, and give a secure place to mount accessories. Adding a quick release interface makes it faster to swap from tripod to gimbal to handheld without re-threading screws every time. This guide breaks down what to look for, how to set it up, and when a quick release side handle is the right choice for a camera cage build. For more guidance, see Micro 4/3 – Review: Haoge HG-EM5III (E-M5 mark III) grip.
What a Quick Release Side Handle Adds to a Cage Rig
A quick release side handle is less about adding “another grip” and more about making the rig behave predictably when time is tight. The right handle helps you move faster while keeping the camera secure and comfortable to operate. For further reading, see Camera Shooting Handle Grip For Insta360 Ace Pro 2/ ….
- Speeds up transitions between shooting modes by allowing fast detach/attach from the cage.
- Improves handheld stability by moving grip position to the side of the rig, helping balance heavier lenses or monitor setups.
- Creates a consistent grab point for run-and-gun work, reducing the chance of grabbing the lens, follow focus, or cables.
- Supports accessory placement (depending on handle design) such as cold shoe items, small lights, microphones, or cable clamps.
Quick Release Systems Explained (and What to Match)
“Quick release” can mean different interfaces, and compatibility is where most frustrations happen. Before buying, match the handle’s quick release standard to what your cage actually supports, then confirm it won’t interfere with ports or articulation.
- Plate-style quick release: uses a sliding or drop-in plate; ideal for repeatable positioning and quick swaps.
- Clamp-style quick release: clamps onto a rail/plate profile (often Arca-type); common for modular rigs.
- Watch for compatibility between the handle’s interface and the cage’s mounting point—mixing standards can cause play or require adapters.
- Prioritize anti-twist design: pins, locating points, or rosettes help prevent the handle from rotating under load.
- Check clearance: quick release levers/knobs should not block HDMI/USB ports, flip screens, battery doors, or top handle grip space.
For a deeper look at common accessory interfaces and how manufacturers think about mounting standards, review ARRI’s ecosystem overview at ARRI. For quick release plate basics and terminology, Manfrotto’s support resources are a helpful reference at Manfrotto.
Fit, Ergonomics, and Mounting Options
Once the interface matches, comfort and control become the real deciding factors. A handle that feels “fine” for five minutes can feel exhausting after an hour of handheld coverage, especially with a monitor, wireless receiver, or heavier zoom.
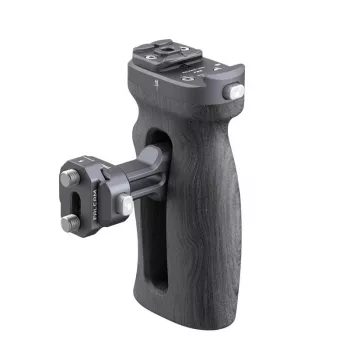
- Grip shape and length: a longer grip can reduce fatigue on heavier rigs; a shorter grip can keep setups compact for gimbals.
- Left-side vs right-side use: some handles are reversible, while others are shaped for a specific hand.
- Vertical adjustment: the ability to slide up/down can help align the wrist with the camera’s center of mass.
- Mounting points: common options include 1/4″-20 and 3/8″-16 threads, ARRI-style locating holes, NATO rails, and rosettes.
- Accessory mounting: check for cold shoe, threaded holes, or strap slots if a wrist strap or lanyard is desired.
Quick Release Side Handle Compatibility Checklist
| What to check | Why it matters | Quick test before a shoot |
|---|---|---|
| Mounting standard (NATO/Arca/rosette/threads) | Prevents wobble and avoids needing adapters | Confirm the handle attaches securely to the cage without forcing or partial engagement |
| Anti-twist features | Stops rotation when lifting or panning | Hold the rig by the handle and gently twist; there should be minimal movement |
| Port and screen clearance | Avoids blocked cables and limited articulation | Plug in HDMI/USB and open the screen while the handle is installed |
| Load and leverage | Heavier rigs amplify flex at the connection | Lift the rig one-handed for 10–15 seconds; check for flex, creaks, or slipping |
| Repeatable positioning | Keeps grip height and balance consistent | Detach and reattach; the handle should return to the same position without re-tuning |
Setup Tips for a Rock-Solid Connection
When a Quick Release Side Handle Is the Best Choice (and When It Isn’t)
Product Option: Quick Release Camera Cage Side Handle
If your priority is faster reconfiguration without losing a confident handheld grip, the Quick Release Camera Cage Side Handle is built to add a quick detach grab point to a cage setup.
More In-Stock Finds
- 12-Ton Heavy Duty Hydraulic Shop Press for Garage and Workshop
- 16 Piece Blue Stoneware Dinner Set – Elegant Floral Embossed Plates & Bowls
- How to Choose Chandelier by Height and Scale Checklist | Chandelier Sizing Guide | Lighting Design Tips | Digital Download
FAQ
Will a quick release side handle fit any camera cage?
Fit depends on the handle’s mounting standard (such as NATO rail, threaded mounting points, or a rosette) and which interfaces your cage provides. Confirm the required standard, check any locating hole patterns, and verify that ports and screens still clear once the handle is installed.
How do side handles prevent twisting or loosening during shooting?
They rely on anti-twist features like locating pins/holes or rosettes, along with properly set clamp or lever tension. A firmly mounted cage is essential, and a quick pre-shoot twist test (holding the rig by the handle and gently rotating) helps confirm everything is locked in.
Is a quick release handle safe for heavier rigs with monitors and batteries?
It can be, but heavier builds increase leverage and torque at the connection point, so anti-twist design and correct clamp tension matter more. Check any manufacturer load guidance and test the handle with your full rig weight before using it on critical shoots.














Leave a comment